
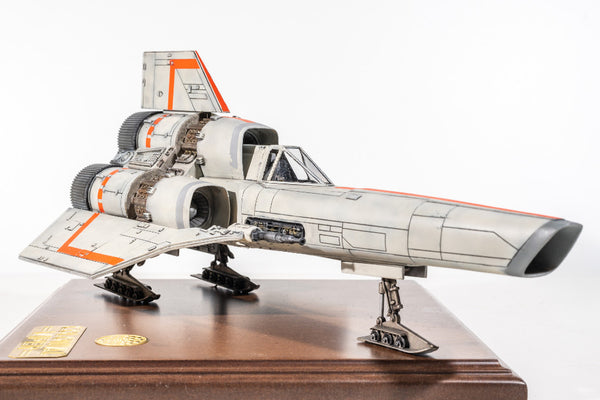
Build Review - Battlestar Galactica Colonial Viper MK.I
Review Date: April 2020 Subject: Battlestar Galactica Colonial Viper MK.I
Scale: 1/32 Kit Number: Moebius Models 940 Cons: See text
Pros: Latest available and most complete kit (released 2013)
Skill Level: Average to Skilled (Lighting) Cost: 40 – 60 €
History
The Colonial Viper introduced with the original television series in 1978 of Battlestar Galactica. The prestigious Viper Mark One (also referred to as the Starhound Class Viper) is the first model of the illustrious Colonial Viper space superiority fighter. The Mark I first entered military service shortly before the First Cylon War as a preemptive counteraction against the now independent Cylon Fleet, the Viper Mark One was later replaced with the Viper Mark II.
Specifications
Class/Type: Viper
Length: 29 feet (8.7m)
Height: 13 feet (3.8m)
Main Power/Fuel Systems: Tylium core (Central)
Sub-Light Engines: 3 sublight aft-mounted engines
Main FTL Engines: 1 heavy hyperengine (central)
Missle Systems: 2 fusion missile launch tubes
Kinetic Projectile Weapons: 2 KDM Kinetic Areo-Rifles (Colonial Standard)
Particle Beam Weapons: 2 forward-firing laser-torpedo guns
Primary Heavy Weapons systems: At least 1 Nuclear warhead
The kit
Previous releases from Monogram and Revell-Monogram luck some of the basic features like canopy, cockpit, pilot figure and clear engine exhaust nozzles to support lighting. The Moebius Models released in 2013 is considered the most complete kit of this series at 1/32 scale.
Included in the kit:
Decent cockpit
Pilot figure with accurate helmet
Well-designed engine intake
Clear engine exhaust inserts for lighting
Landing gear
Optional display stand
Colored instructions
The canopy isn’t designed to be in an open position. Unlike previous kits, there are some interesting aftermarket options for this new Viper including: lighting, paint masks, markings, photo-etch, and more.
Build Review
The build started by checking for pin marks and sprue flashes, but nothing was considerably wrong, while the total 45 well molded pieces and fit assembly was remarkable. Filler was minor used only for fuselage pieces, just to be sure that no gaps or lines existed for the decals to set down nicely.
The detailing for the cockpit assembly as it comes from the kit is very basic. Because I planned on building this model with proper lighting, I used the ParaGraphix Photo Etch detail set PGX175. There is a nice aftermarket set for the kit that includes cockpit and engine Photo Etch details. The design of LEDs lighting and the flickering engines effect was done from scratch. An open-source hardware and software was used for driving 6 LEDs in total with a battery power source 3.3 – 6.6 Volts while the coding was straight forward for me to write it and test it.
I didn’t use the pilot figure (I never do for my kit builds) and left it on the side together with a clear stand since the landing gear was used instead, which was a perfect touch to hide the wiring and pass it under the wooden base. With a bit of work all the wiring fit to the back landing gears and became invisible. Landing gears need some extra sanding, painting, and weathering work to look realistic.
After the completion of the cockpit and fuselage, I turned to the engines part. Working in different areas of the kit made my work easier since engine lighting took some time to align with scratch building. I noticed that flickering was working nicely but something was missing. Photo Etch and backlight films to soften lighting from ParaGraphix is a great upgrade, in addition to that plastic film was used to cover the inlet of engines for the light to have a better blast.
Decals was really a challenge. DACO medium solvent did the work to soften enough the decals to set down into the panel lines. Still, the decals needed extra care, even after setting down and one gloss varnish, it was too fragile to work with.
The firing laser-torpedo guns, drilled and built separately, were the last items added to the kit. If I added the guns from the beginning, it would create difficulties in painting and weathering the fans and other parts of the kit. I used different techniques like pre-shading with black enamel paint and weathering with Tamiya black and concrete, while I varnished 3 times (two gloss and one matt) with Mr. Hobby. All colors I used were enamel from AKAN.
This Moebius kit was a great subject to work with. For a beginner it is an easy build but if you want to add lighting and extra weathering, then an average to a skilled modeler should step in. I spent 60 hours to build and finish the kit.
 
|
 
|
 
|
 
|
 
|
 
|
|
|


Video
Tags:
2 comments
Wow, lovely build. Great detail! and with lighting too. Beautiful. Good job.
That is amazing. Love the build. I built one back when the original series was on. Ive resently been trying to find a kit of the MK1, but the price is way out of my buget. They are almost $100 for a 1/32 scale. If i could find one in the 30 range ig gladly purchuse it. Thank you for your post.
V/r Bobby Pritchard